Alexander Peppe, Author at Alex's Piano Service - Page 4 of 4

Cleaning FAQs

How do I clean my keys?
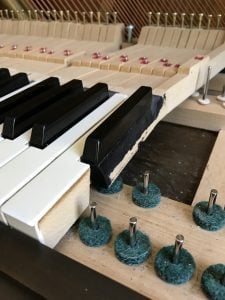
Carefully! My favorite key cleaning solution is Cory Key-Brite, which is available on Amazon. It can also be purchased at Starbird Piano in Portland or through me. Lacking this, the actual key tops can be cleaned with a damp cloth, provided that the cloth is well wrung out. You don’t want the keys to get wet, as the keys are very sensitive to moisture and will warp easily.

Another good product is MusicNomad’s Key One Cleaner, also available on Amazon. I use Cory Key-Brite when doing detail work, but Key One is also a suitable option if you’re wiping down your keys on a more regular basis. (With Cory you can expect to do a little more scrubbing, whereas Key One is thinner and behaves a bit more like Windex.)

If you are a regular customer of mine, please order these supplies through me. I can provide them to you at a lower price than Amazon, since I needn’t ship them!

How do I clean the rest of the piano?

Microfiber cloths dust off the outside of the piano effectively. If you have a high-gloss piano, it is worth investing in Cory Super Gloss Polish, which can also be purchased at Starbird Piano in Portland or through me. Cleaning underneath the strings and cast iron plate of a grand piano is an involved process, generally taking hours. This is a service I provide; however, if it is something you are interested in doing yourself, or you are located outside my service area, consider purchasing piano cleaning tools:

Spurlock Tool’s “Squeegee Type” Soundboard Cleaner is a very professional tool costing about $100. It will give you excellent and reliable results, without having to remove the lid of the piano. I especially recommend these tools if you have a venue or other location where cleaning is important and routine.

Soundboard steels are inexpensive, but they are a labor-intensive option that will require removing the lid of the piano for convenient access. If you have patience, this is an inexpensive solution.

My piano smells awful! What can I do?

The folk remedy for piano odor, which I learned working on consignments at Starbird Music, is to put dryer sheets inside the piano. This is pretty effective for dealing with smoke odor. However, with any strong, offensive smell, it’s essential to find the source of the problem. Over the years, I’ve seen many pianos devastated by moths, mold, and mice. If you believe your piano has fallen victim to any of these, it needs a thorough and professional cleaning as soon as possible.

Often, in cases of serious mold, I will clean the piano out and then install a Dampp-Chaser dehumidifier system inside the piano to make sure the issue doesn’t return.

Recently, I’ve been tenting and ionizing pianos. In extreme cases, such as very moldy pianos in homes where residents have mold allergies, this can be a very effective technique. See “Can you clean out smoke, mold, and bad smells with an ozone generator?” below.

What can I do about mold?

Mold invades the felt and wood inside the piano, and it can be extremely difficult to remove in older pianos where it has been allowed to flourish. Newer pianos are generally chemically treated, and mold invasions tend to be smaller in scale, although not always. In any mold invasion, the entire piano should be professionally cleaned and treated, with the action and keys removed. If possible, the piano should be left disassembled and placed in direct sunlight for several days to kill the remaining mold.

When cleaning mold, I’ve found 12% hydrogen peroxide to be an optimal cleaner. I purchase 1-gallon containers of 12% peroxide. This peroxide is devastating to mold, but needs to be handled with gloves, safety glasses, and caution. In addition to being highly effective against mold, peroxide ultimately leaves behind nothing but oxygen, which makes it uniquely clean.

(Please note that most studies I’ve seen imply that returns rapidly diminish after a 10% concentration, so purchasing higher concentrations of peroxide simply endangers the user without more effectively killing  more mold.)

If somebody has a mold allergy or the mold is particularly severe, I also recommend using an ozone generator. See “Can you clean out smoke, mold, and bad smells with an ozone generator?” below.

A dehumidification system must be installed directly inside the piano. You can either install an entire Dampp-Chaser® Piano Life Saver System, which both keeps the piano dehumidified and humidified when the weather is dry, or you can install their dehumidifier only system. The dehumidifier is all that’s necessary for controlling mold. These work really very well, and will (under all by that most extraordinary circumstances), keep the interior of the piano cabinet below 40% humidity. Most mold won’t grow well or germinate below about 80% humidity, and most of the data I’ve seen has implied all strains are effectively unable to germinate below 60%. This humidity control is absolutely mandatory for controlling mold from here on, even if we think we’ve killed basically all of it.

Finally, consider a humidity monitor. This is a tiny sensor installed inside the piano, which will operate on battery power, and will set off an alarm (in the form of an email or text message) if the relative humidity clears a certain threshold (such as 50%). You’ll get an immediate alert if there’s the potential for mold to grow inside the cabinet, and can correct it quickly. Most likely, this would happen if the dehumidifier were unplugged.

This device allows us to trust that the dehumidifier is operating as intended. This is important, since you can’t actually see or hear the device, people might accidentally unplug it, and so forth.

Can you clean out smoke, mold, and bad smells with an ozone generator?

In severe cases, I ionize the piano. Starting about a year ago, at the recommendation of a favorite eccentric customer, I made my first trial of ionizing a piano—or filling it with ozone gas. I tent the piano and place it with an industrial ionizer.

For this, I use an ozone generator that provides at least 10,000 mg/h of ozone (such as the Enerzen O-555).

Ozone is very harmful to organic substances, so it’s best not to overdo it. You want to make certain you use enough to kill the invading mold, but not so much that items in the household start degrading. In particular, plastic and rubber will off-gas rather unpleasantly. You may have to replace rubber components inside the piano (notably the pedal attachments) sooner after this treatment.

During the ionization process, all living things must leave the home. Even houseplants should ideally be moved away from the generator. Ozone gas is irritating to lungs. In terms of the chemical effects, it’s similar to breathing ultraviolet light (if somebody could do such a thing). However, as ozone reacts with biological substances, it degrades into oxygen, which is harmless. Once the ozone generator has finished its cycle, leave the house unoccupied for at least an equivalent period of time (six further hours if you ran it for six hours) with, ideally, the windows open.

Finally, consider a humidity monitor. This is a tiny sensor installed inside the piano, which will operate on battery power, and will set off an alarm (in the form of an email or text message) if the relative humidity clears a certain threshold (such as 50%). You’ll get an immediate alert if there’s the potential for mold to grow inside the cabinet, and can correct it quickly. Most likely, this would happen if the dehumidifier were unplugged. For this, I use the

This device allows us to trust that the dehumidifier is operating as intended. This is important, since you can’t actually see or hear the device, people might accidentally unplug it, and so forth.

What about mice?

Mice can do colossal damage, but seldom do in newer pianos because of their chemical mold treatments. In older pianos, if the colony nests inside the piano, the damage can be devastating.

The initial response is a total cleaning and an evaluation of the damage to moving parts. Additionally, mouse urine can cause warping, sticking keys, and mold. Once all visible evidence is removed and parts are replaced, there are two possible forms of prevention.

Treating the house for mice is ideal. However, this isn’t possible, the piano interior can be thoroughly scrubbed with a solution containing peppermint oil, and a saturated cloth left in the bottom. Another highly rated chemical repellent is Grandpa Gus’s Mouse Repellent. Any visible openings can then be covered with steel exclusion fabric.

Some customers use ultrasonic rodent repellent, but I have none of that I can recommend at this time. They do not seem to be effective as a long-term solution.

Can I polish the strings?

Sometimes, piano dealers polish the strings using 3M pads and steel wool. This can only be done to treble strings, not copper-wound bass strings, and will almost certainly throw the piano out of tune. If your strings are regularly breaking or are severely rusty, it might be worth considering having your piano restrung by a rebuilder.

Tuning FAQs

Why do pianos go out of tune?

Pianos go out of tune as humidity changes. Here in Maine (and New England in general), indoor humidity is highly unpredictable: Constant small fluctuations in humidity mean your piano can go out of tune even more quickly than in other parts of the country which experience only major seasonal changes.

These fluctuations can happen much faster if the piano is near a window, an air conditioner, a heat source, a humidifier or dehumidifier, an outside wall, or is in a drafty space. A piano placed in front of a baseboard heater can go out of tune in the matter of weeks, rather than months.

Major seasonal changes are not the primary reason a piano in our locale goes out of tune. Daily changes in humidity are the main factor. Fortunately, by controlling humidity, tuning stability can be improved.

Humidity is always changing. Your piano will go flatter as the air dries, and sharper as it gets more humid. And every time your piano’s tuning changes, some parts change at different rates than others. Eventually, the piano is out of tune with itself—that’s when it needs a tuning!

How often should I get my piano tuned?

I recommend tuning your piano a minimum of once every six months. If the piano is used for performances, is in a high-traffic and high-use environment like a church or a restaurant, or is very new, I recommend a minimum of once every three months.

If nobody plays the piano and you’re simply storing it, an annual tuning can be adequate if the piano is in a sufficiently stable space and doesn’t appear to be experiencing excessive humidity swings.

Why does my piano go out of tune so quickly?

The primary reason for a piano to go out of tune quickly is the environment and humidity changes in the environment the piano is kept. See “Where should the piano be positioned?”

Sometimes, loose pins can cause a piano to quickly sound dreadful, like two keys are being played at once. This usually happens in dry weather. However, some pianos with soundboard or bridge cracks can go out of tune very quickly. These will require more serious repair than can generally be performed in a home, and I can direct you to an experienced rebuilder.

If your piano is already in an ideal space and is still going out of tune quickly, or if you’re unable to move your piano to a better space, you might consider a Dampp-Chaser Piano Life Saver System™. These control the humidity inside the piano itself, and can considerably improve tuning stability in challenging environments, in addition to protecting the piano from dangerous humidity extremes.

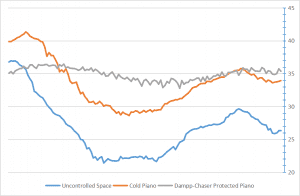
Remember that chart up above? That’s just what’s happening in the room. Here’s what’s happening inside a piano protected by a Dampp-Chaser system. Yes, the humidity still changes, but much less than the room!

How long does a piano tuning take?

A newer piano that has been tuned within six months will usually take between 50 and 75 minutes. Some pianos can take up to two hours if they’re very far out of tune.

Should I wait to tune the piano after I move it?

If you’re just moving a piano a short distance within your house, the majority of pianos will not require any time to settle. The physical action of moving doesn’t generally alter tuning. However, changing the environment of a piano—moving it between houses or even towns—will almost certainly cause settling and adjustment. In these circumstances, I recommend waiting a minimum of two weeks before tuning. See my Piano Moving FAQs.

Will it cost more if it’s been a long time?

It depends. When a piano is dramatically out of tune, I’ll need to perform a “pitch adjustment.” A pitch adjustment is a very quick tuning designed to get the piano close to concert pitch before the actual tuning. This pre-tuning is necessary, as otherwise the piano will go out of tune as I tune it.

Pitch adjustments considerably change the tension within the piano. A piano that’s a half-step below concert pitch will undergo an overall internal change of almost one ton of tension during a tuning. This means the tuning does not last as long because the instrument will settle, and it also means the process of tuning it will take longer. You will want to consider getting it tuned a second time after about a month.

I do not charge extra if I can still tune it in my expected time frame of two hours, and I almost always can. However, the tuning itself will not last as long, and a follow-up will likely be necessary.

Do you tune by ear?

I tune using a Sanderson AccuTuner. After tuning, I will aurally evaluate the piano and will retune individual keys or perhaps a small section by ear if I think, for some reason, the machine’s “perfect” doesn’t match a human ear’s “perfect.” I do not, at this time, know of anyone in Maine who tunes primarily by ear, and if you know of one or are one please contact me!

What’s the difference between a fish and a piano?

You can tune a piano, but you can’t tuna fish.

Do you service players?

Players fall in two categories: Older player uprights, generally from the 1920s, and newer electronic players from the 80s onward. I can tune both, but the older 1920s players can present some unique challenges when regulating or repairing them. The player stack is heavy, and generally difficult to remove, and it sits between me and the action. You should expect this to take some extra time.

While I can help you set up your Yamaha Disklavier or other electronic system, I do NOT do repairs or rebuilding on the actual player mechanism, old or new. I do not currently have anyone to recommend for this work, and if you are such a person, please contact me.

My piano has a weird buzz. Can you fix that?

There are many possible reasons for a buzz. These range from debris on the soundboard, to poor string seating, to structural faults, to peeling glue on the edge of the soundboard. I will do my best to find the source of the problem in your piano and come up with a reasonable treatment.

Where do I find a teacher?

Funny you should ask: I have a handy list on my teachers page!

Are my ivories worth anything?

It is a federal crime to buy or sell ivory, and so the market value is zero. They are worthwhile to keep (or give to your technician) since they can be used to replace broken or missing ivories on other pianos.

Can you fix my broken music rack?

I do carry replacement hardware for music racks. If the music rack itself is broken, then the options depend on the piano: Upright pianos often have generic, easily replaceable music racks. If your music rack is hinged, I can almost certainly order a replacement readily. Grand piano repairs can be more complicated, but I do them. I might opt to work with a carpenter depending on the nature of the repair and the intricacy of the detail of your particular music rack.

My piano is too loud! What can I do?

If it’s a grand, you can leave the lid down. Another easy fix is putting a rug underneath the piano, which does a lot—especially for grands. If you have an upright, you can also cut a rectangular piece of foam insulation to set behind the piano. In this application, exposed foam does best.

It’s possible that your piano is too bright, and needs to be voiced down. Depending on the piano, this can be done by sanding the surface of the hammers, needling the hammers, or applying chemical hammer softener.

Where should the piano be positioned?

It should be positioned along on an inside wall away from doors and windows. Outside walls change temperature (and thus relative humidity) more quickly than inside walls.

Make sure it is in a large enough room. Small rooms change temperature and humidity quicker than large rooms because of the volume of air. The exception would be a small space with very well-controlled humidity.

Control the humidity in the room. Dehumidifiers or air conditions prevent the air from getting too humid in the summer, and humidifiers keep the piano from drying out in the winter. If you cannot control the humidity in the room, then I can install a Dampp-Chaser Piano Life Saver System™.

Our piano is in a building that isn’t heated in the winter. Do we need to do anything?

This is a pretty common situation here in Maine in churches and grange halls. Curiously, pianos exposed to colder temperatures tend to hold a better tune overall—this is because it’s largely the heating of the air that causes dryness in the winter, and cooler spaces maintain better humidity levels.

However, there is a tremendous risk of condensation forming on the strings and pins inside the piano and its action, which will initially cause rust and sluggishness and can eventually cause mold. Both rust and mold can become terminal conditions in a piano quickly, especially one that’s left unplayed and unattended to for months at a time. In this cases, my strategy is the installation of a Dampp-Chaser Piano Life Saver System™, or even just the Dampp-Chaser dehumidifier which is considerably less expensive than the complete system. See more about Dampp-Chasers.

The movers broke my pedals! Can you fix them?

It’s quite common for home movers unfamiliar with pianos to struggle when putting together the pedal assembly—this is one good reason to hire professional piano movers. Usually in these cases nothing is actually broken, and I can put the pedals back together in the same visit. However, in the case of major breaks, I can supply replacements (usually on a return visit) or can duplicate components (often with the help of a carpenter).

Something fell into my piano! Can you get it?

Yes. If a pen or pencil rolled in behind the fallboard or music rack, it is unlikely to do any damage other than making noise when you play a key—many times, my clients have no idea anything even fell in! However, if you notice a key no longer plays or feels stuck, or if the object fell into the action of your grand piano, give me a call and I’ll be by to remove it as soon as possible!

If it’s especially unreachable, I can hunt in hard to reach places using an endoscope.

My last tuner said the pins were too loose. Is this a problem?

A lot of tuners are not technicians—that is, they tune pianos but do not perform repairs. Tuning pins can often be sized up, or even just set deeper into the pinblock. However, if MANY tuning pins are loose or the pinblock itself is damaged (which is often difficult to judge in uprights), then the piano might be in need of a rebuild, which is extensive work done in a shop.

However, not everybody is looking to rebuild their piano. You might be looking for a solution that will work for the next few years, and is a whole lot cheaper. If the piano has dreadfully loose tuning pins, and another technician has already given up on it, there does exist one remaining (and interesting) solution: There’s an extremely viscous cyanoacrylate (sold by the brand name Hot Stuff Original Instant Glue) can be dripped around the tuning pins. It will wick into the pinblock and crystallize, swelling the wood. It takes approximately one bottle to treat a single piano. It does not bond the tuning pins to the pinblock, but rather swells the pinblock and consequently increases its grip on the pins.

This chemical wizardly can rescue pianos that otherwise seem quite far gone, although it’s not guaranteed if the pinblock is badly cracked or damaged. Nonetheless, I’ve had multiple situations where it seemed very nearly miraculous, and the customer was spared the cost of rebuilding the pianos for years.

If the piano is an upright, it’s necessary to lay the piano on its back before treating. (This typically requires a piano dolly unless you’re singularly gargantuan, and I’ve heard stories of such technicians.) Vacuum the area around the tuning pins so you don’t glue too much dog hair and other debris permanently in place. Leave the piano in this position until Hot Stuff has had adequate time to cure—you don’t want it to drop down the strings when you stand the piano back up. After an hour or so, the tuning pins should be set much more firmly, and tuning stability will likely be much improved.

In short, a piano with some loose pins is generally worth a second look by a technician, and about two thirds of the time I find I can correct the problem in-home.

Do you tune Mason & Hamlin Screw Stringers? Wegman’s? Square Grands? Birdcage Uprights? This unique thing I found in my basement I can’t find anywhere on the internet?

If your peculiar piano is in good condition, I’ll do my very best to tune it. And if I can’t, I’ll at least photograph it and look at it in wonder.

I can tune Mason & Hamlin screw stringers and birdcage uprights, if they’re otherwise in good condition. I’m always willing to take a look at something truly novel.

Most of the time, square grand pianos are not able to be tuned to anything resembling a modern tuning, and much of the time not even to themselves. This is because they are, by definition, very old, with most of them being from the 1850s and 1860s. They also simply weren’t built as ruggedly as pianos of even a few decades later, and mechanical issues typically abound. You’re better off completely rebuilding it if you’re passionate about the design.

Wegman uprights are real oddities, with their peculiar tuning pins. I can’t even find a picture of one on the internet to share here, so I’ll definitely come look at yours. When I first encountered one, I couldn’t find anyone else who had even seen such a thing. For the uninitiated, this is a design of piano that doesn’t use a pinblock: Metal tuning pins are placed through the cast iron plate, and then have a notch with a wedge driven in from the other side to hold them in place. They typically can be tuned, although replacing tuning pins is, essentially, machine work.

Piano Moving FAQs

Who do I contact to move my piano?

There are two well-established piano moving companies here in Southern Maine: The Piano Movers of Maine (207-939-3018) and Starbird Piano (207-775-2733), both of which are based in Portland. Both, in my experience, are willing to travel pretty far.

Pricing for piano moving is quite variable, and you should have the following information ready: The location the piano is moving from and to; The number of steps at both locations; The size of the piano (length for a grand or height for an upright).

If you need an especially long-distance move between states, reach out to Piano Movers Inc. They service all of New England.

Do I really need a professional mover?

Pianos weigh many hundreds of pounds (about 400 for the smallest spinets and 1200 for the largest grands). They can also move unpredictably because of their often dramatically uneven weight distribution. Although moving a piano poorly could damage it, the real risk is to the people and the environment. On a flight of stairs, a piano can quickly transform into an unstoppable battering ram, leaving a path of devastation behind it.

The typical rule of thumb is to call a professional if either you’re moving a grand piano, or if you’re moving an upright and more than three stairs are involved at either location.

Can I just use a regular moving company?

Typical household movers don’t have adequate experience taking pianos apart and putting them back together. They might be able to move an upright, but grands are another matter altogether. I regularly have to reinstall pedal lyres that were improperly installed by movers. I’ve also cleaned up after several piano drops (one of which trapped a person). These are nightmare experiences for everybody involved. These are typically caused by the piano moving in a way the mover didn’t expect, given their uneven weight distribution. If at all possible, choose somebody with substantial experience moving pianos!

I once was called in to help “experienced piano movers” remove the legs from a Steinway. They couldn’t figure out how they came off! I won’t name the company, but it was a large, local moving firm, and they’d begun attempting to remove the bolts holding the key bed to the rest of the cabinet when I arrived. If they’d succeeded, it would have been quite the insurance claim!

Dampp-Chaser FAQs

Do Dampp-Chaser Piano Life Saver Systems help with tuning stability?

I always recommend maintaining stable humidity in the room the piano resides in, first and foremost. This is the best possible solution for the piano, although in Maine this can be challenging.

If controlling the humidity in the room is neither practical nor possible, then consider purchasing a Dampp-Chaser Piano Life Saver System. These systems can protect the most vulnerable parts of your piano and assist with tuning stability, even in unstable and extreme environments.

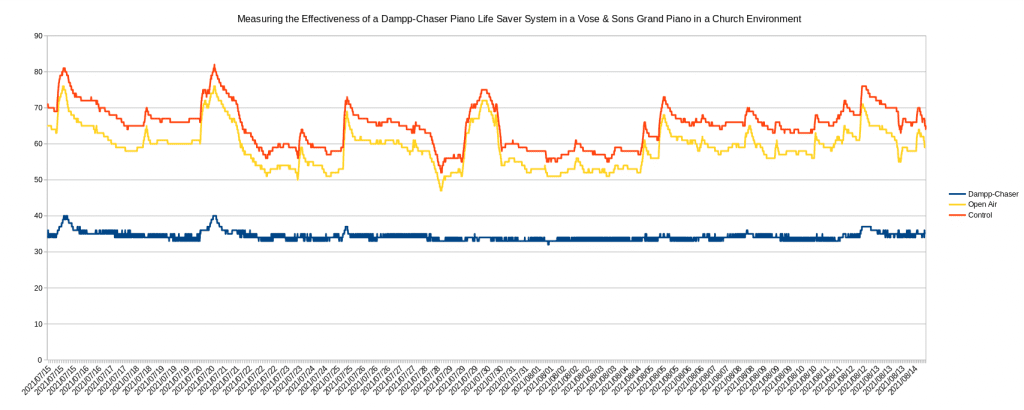
But I didn’t just take their word for it! I’ve installed remote humidity sensors in several pianos, and my finding has been that Dampp-Chasers do, in fact, keep the humidity inside pianos noticeably more stable. They’re particularly effective at keeping summer humidity under control, and are capable of bracing pianos against even the high humidity of a coastal Maine summer. The graph below depicts the performance of the system in a Vose & Sons baby grand piano located in a church:

The above piano has far more tuning stability than it did before, and the Dampp-Chaser will also protect against mold and corrosion. The piano in the above graph does have an undercover installed, and I nearly always recommend including these on grand installations.

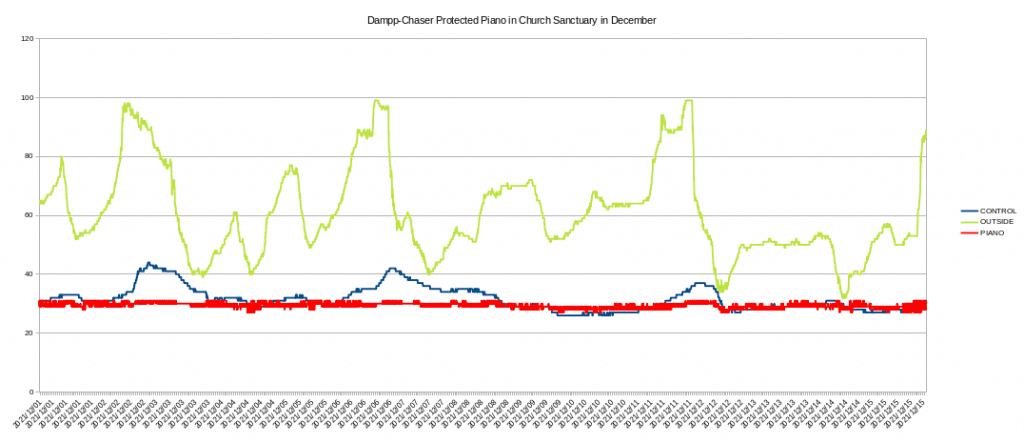
This chart shows typical wintertime performance. The green line indicates outdoor humidity (not included in the first chart). As you can see, outdoor humidity varies tremendously during the Maine winter, and routinely reaches nearly 100%. The air, once heated, dries out considerably, and you can see this relationship represented by the blue line. Finally, the red line represents the humidity as measured at the piano itself, and you can see the Dampp-Chaser effectively smooths out the variation.

Do Dampp-Chaser Piano Life Saver Systems protect my piano from extreme humidity?

One of the largest benefits of a Dampp-Chaser system is that it protects several of the main structural components of your piano from the harshest extremes. During the winter months, in some evenings the relative humidity indoors can be as low as 10%. (I’ve measured as low as 5% in some customer’s houses.) This is close to the humidity the piano might experience in Death Valley during the summer. Conversely, Maine summers can see relative humidity clearing 80%. Both of these extremes can be absolutely devastating for soundboards, bridges, and other finely constructed wooden components and glue joints.

The dehumidifier also does a superb job keeping out condensation and mold. A dehumidifier only system (about a third the cost of the full system) can be installed in pianos susceptible to mold.

However, it’s important to mention that the Dampp-Chaser system does NOT protect the pinblock. Even though the Dampp-Chaser offers significant protection to much of the piano, the humidity of the room should always be controlled to the extent possible.

Does the piano have to be tuned after the Dampp-Chaser is installed?

Generally there will be some settling after the system is installed. The usually recommendation is to wait about two weeks for the piano to settle, and then tune it.

Often with my customers, I’ll recommend timing their Dampp-Chaser install for a few weeks before their next regularly scheduled tuning.

Do I need to do anything once it’s installed?

Your only obligation is filling the humidifier when it requires it. There’s a light installed on the piano that will flash when the system needs to be filled, and it comes with a special fill bucket.

Do they wear out?

There are no moving parts, so Dampp-Chaser systems generally last decades. Once every year or so, the humidifier will require a new set of paper wicks, and I provide these for free at regular tuneups.

Why do Dampp-Chaser system installation quotes vary so much?

The Dampp-Chaser is a retail product, sold through technicians. The technician acts as both the installer and the retailer. Aside from the initial price of the product and any delivery fees, the technician will add a retail markup and then add their installation fee, which might be flat rate or hourly. Different technicians handle this pricing structure very differently, and you’ll see Dampp-Chaser quotes ranging widely. The most important detail is that your installer understands the system conceptually, and has experience adapting it to many different pianos effectively. Every Dampp-Chaser installation is a little bit unique—some very—and your installer needs to be up to the task.

Yamaha Disklavier FAQs

My Yamaha Disklavier just makes a ‘Pop’ when I press the power button and doesn’t light up. Or it whines loudly while it’s running, and then powers off? Can you fix it?

Yes! This is a common problem with older Disklaviers, and usually indicates that the power supply has failed. I can box it up and send it to Tap Electronics, who can then rebuild it. At present (1/17/23), this is a flat-rate service provided by Tap for $750. Tap Electronics is authorized by Yamaha.

My Yamaha Disklavier runs for a few seconds (or even a few minutes), but then turns off. Can you fix it?

Yes! You might have a power supply that’s dying (in which case, see the answer to the last question). However, you might simply have a damaged power button. You can test this by wiggling the power button side-to-side with your finger. When they wear out, sometimes even just the vibrations of the piano can cause them to switch on and off. These buttons aren’t terribly difficult to replace; however, they’re discontinued.

Their (discontinued) Yamaha Part number is VN388300. The switch itself is a (discontinued) ALPS SPPH23. You can see a spec sheet for the ALPS SPPH230500 here. Unfortunately, I haven’t found an exact duplicate, and would love to know if you have. I purchase bulk generic locking switches from Amazon and use sandpaper to shape them to size.

Can you set up my wireless connection / fix my terrible connection?

Yes! I wrote a definitive guide on connecting the Disklavier wirelessly. I don’t generally recommend using the native wireless adapters that come with your device, which are clumsy and confusing. I use PowerLine adapters, which allow you to broadcast your network signal right through the power lines in your house! This technology means neither you nor your piano ever have to adjust and reconfigure anything. No keeping track of passwords, no weak signals, and no need to call a technician every time you buy a new router. Just plug in your piano and marvel at its spontaneous, excellent internet connection.

This works in most homes, although in particularly large houses or houses with old wiring the PowerLine adapters might have trouble. In that case, the best device to use is a WiFi extender mounted underneath the piano.

Can you replace or upgrade old floppy drives?

Replacement is sometimes an option, and upgrading always is. Most manufacturers have stopped producing replacement drives, but they can often still be purchased second hand. eBay is a good resource.

However, I recommend upgrading to a USB floppy disk emulator. The Bulgarian company Nalbantov Electronics manufactures USB floppy disk emulators specifically for older digital pianos and players. These systems allow you to use a single USB stick in place of dozens (if not hundreds) of floppy disks. As solid-state devices these are considerably more durable and long-lasting than old-fashioned floppy drives.

With some generations of Disklavier (most notably Mark II / MX100II / MX100A / MX100B devices), the floppy disk drives are mounted behind a shaped plastic piece. In these cases, you’ll need to cut away the old plastic facing (a pair of flush-cut nippers is helpful here), install the new drive, and put some kind of buffer around it. I’ve experimented with a few different choices for something functional and attractive. Neoprene works to fill in the around around the drive, but it doesn’t help much with keeping the Nalbantov securely in place.

I have a 3D model of a floppy bezel that’s sized to fit around a Nalbantov. You can 3D print this yourself, or I can mail you one. This mount holds the Nalbantov in place, and also fills in the gaps around the edges. It’s an all-in-one solution for mounting the Nalbantov, and allows you to reuse the same screws the original floppy disk drive was installed with.

You can read more about this on my Nalbantov Floppy Disk Drive Upgrades page.

Yamaha E3/DKC-850 Firmware Update

The Yamaha E3 (or DKC-850) firmware update is wonderfully simple, unlike its older Mark IV sibling. The entire update can be done using just a USB stick with at least 20MB of memory.

The Problem

In October of 2020, Yamaha mandated that its pianos use better encryption standards (all pianos now use TLS 1.2 instead of TLS 1.1). If you connected your piano to the internet before October of 2020, it probably automatically updated to the latest firmware. However, if you weren’t so lucky, you’ll have to perform the updates yourself.

The Solution

First, you’ll need to download a copy of the new firmware, and you’ll need a USB stick.

You can obtain this either by downloading the Yamaha E3 v3.54 file (dkv_update.bin) from me, or you can visit Yamaha’s website for an archived copy. Once you have the dkv_update.bin file, simply copy it on a USB stick (not in any directories or folders). Take that USB stick and insert it into your Disklavier. Now hold down the Play / Pause button and power on the system (with the Play / Pause button still held). From there, you can follow the on-screen instructions.

If you have any difficulties, I’ve attached a PDF of their instructions below. You’ll need to start with “Downloading the Update Program using a PC and USB Flash Memory” on page three.

Yamaha Mark IV Firmware Update

In order to connect your Yamaha Mark IV to the internet, you’ll need to update the firmware; otherwise, you’ll receive an error telling you it can’t connect to the internet. This is a pretty confusing error, since you might actually be properly connected. However, the Disklavier can’t tell the difference between no internet and just unable to talk to Yamaha. As far as it’s concerned, if it can’t see Yamaha, the internet may as well not exist!

The Problem

In October of 2020, Yamaha mandated that its pianos use better encryption standards (all pianos now use TLS 1.2 instead of TLS 1.1). If you connected your piano to the internet before October of 2020, it probably automatically updated to the latest firmware. However, if you weren’t so lucky, you’ll have to perform the updates yourself.

The Solution

Here’s what you’ll need to complete the update:

  1. A CD-R
  2. A CD writer
  3. A blank 2HD 1.44 MB floppy diskette

The floppy diskette is used only by the Disklavier: You do not need to be able to write to the floppy disk from your personal computer.

You can buy blank floppy diskettes from https://www.floppydisk.com/. Amazon and eBay are also good suppliers of floppy diskettes. Personally, I like to use old Sony 2HD diskettes purchased from eBay. Although these aren’t the newest floppy diskettes available, they’re some of the most reliable I’ve been able to find.

CD-Rs are readily available on Amazon, as are CD writers.

You can also purchase both the CD-R (pre-written) and blank floppy disk from me. I sell both for $30.00 at this time. You can purchase one from me here, or contact me at [email protected].

Once you’ve got your media, you’ll need to burn the updated firmware to the CD.

You can download the Yamaha Mark IV firmware 4.26 from me. (The correct firmware is under the Firmware / Mark IV v4.26 directory.)

Once you’ve burned this to your CD-R, you’ll need to prepare your boot floppy. Now, if you happen to have a floppy disk drive and feel like saving a little time, you can copy the floppy disk files me and put them on your floppy disk. You can then skip the below step. The below is copied from Yamaha’s firmware update instruction manual (emphasis and notations mine):

Unit must be completely booted — green standby light solid green
Floppy must have the Protect tab to the Unlock position-hole is covered

1. Insert one Blank High Density Disk--HD--into the floppy drive.

2. On the PRC-100, from the "Interface Main" tap on "Next -->" located on the bottom right corner, it will take you to the next page.

3. Tap on the "Setup" icon. Tap on the "Next -->" Bottom right corner.

4. Tap on "System". Tap on "Make Install FD". It will take approximately two minutes to make the boot Disk.

5. Tap on "OK" when the "Complete" message is displayed.

6. Press on the Back button repeatedly-the button that has the U turn arrow-until you see the "Interface Main"

Once you have the media prepared, follow their instructions for performing the update (emphasis and notations mine):

1. Hold down standby button on the Media Center until the button starts flashing. The Disklavier shuts down.

2. Wait approximately 10 seconds or more, and then press standby button on the Media Center. Update of the I/O Center starts.

3. During update, the buttons on the Media Center light in sequence. Note: The update cannot be performed if the remaining capacity of the hard disk drive is too small. The CD will eject and flash. In such case, close the CD tray, reboot the I/O Center, and then increase the storage capacity, by for example deleting song data in the PianoSoft Library or CD Library by as much as the amount of data stored on one CD. After that, try reupdating.

4. The update will continue for approximately 25 minutes before the CD tray opens. Note: The CD may eject and flash. In such a case, check that there are no scratches, stains, or dirt on the CD that can lead to readout error. If the CD is defective, clean the CD and reload it. The I/O Center reboots. If the CD is defective and a replacement is required, remove the CD and press to close the CD tray. The I/O Center reboots (though updating has stopped). 

5. Wait until the CD tray opens, and then remove the CD and the floppy disk.

(Alex's Addition: You may have to wait another 30 minutes from this point for the update to finish installing. The LED indicators sequentially flash, then illuminate solid, left to right.)

And that’s it! Your firmware is updated. You can now proceed to Connecting your Disklavier to a network! If it’s already connected, you can read more about using piano radio in their Advanced Owner’s Manual (Part 2) on Chapter 8, Page 96.

Complications

Richard Zajac reached out because his update had been interrupted during a lightning storm. He was unable to get his piano to connect to the piano, and he was unable to update it or reapply the update. The proper solution was to reimage the hard disk inside the control center. This is a technical solution, to be sure, but he took the opportunity to update the hard disk inside his control center at the same time. You can read about upgrading or replacing a corrupted Mark IV control center hard disk here.

Casio PX-5S No Media Error

A customer recently came to me with a Casio PX-5S that displayed “Error: No Media” after booting, and which wouldn’t produce any sound.

The Problem

The customer had already researched the issue themselves, and they had determined they needed a firmware update. He’s not alone, and Casio helpfully provides the following message to those with similar struggles: “Well, we’re not 100% certain. […] Casio has worked very hard to try to replicate this problem on units that have exhibited this behavior and have never been able to replicate it.” (See their post on Casio Music Forums.)

The Solution

You can download PX-5S firmware directly from me.

Alternatively, you can download the zipped archive from Casio directly. You’ll need to extract it.

Once you have the “update.bin” executable file, either by downloading it directly from me or by extracting their archive, you’ll put that file into the root directory of a USB stick.

Note that the USB stick must be formatted FAT32—the keyboard cannot read NTFS or exFAT.

If you download from Casio, do not put the ZIP file on your USB. Only the “update.bin” file.

At that point, you can simply plug the USB stick into the keyboard, and the update will automatically begin. It takes about fifteen minutes.

Connecting Yamaha Disklaviers to a Network

If you have a previous generation of Disklavier and haven’t updated its firmware since October 2020, it is absolutely necessary to update it before attempting to connect to the internet. Your Disklavier will tell you it isn’t connected to the internet, regardless of what you do, until the firmware is updated. I have additional information on updating the firmware on the Disklavier E3 (DKC-800 / DKC-850). I can also help with updating the firmware on the Disklavier Mark IV, and can even provide you with the media.

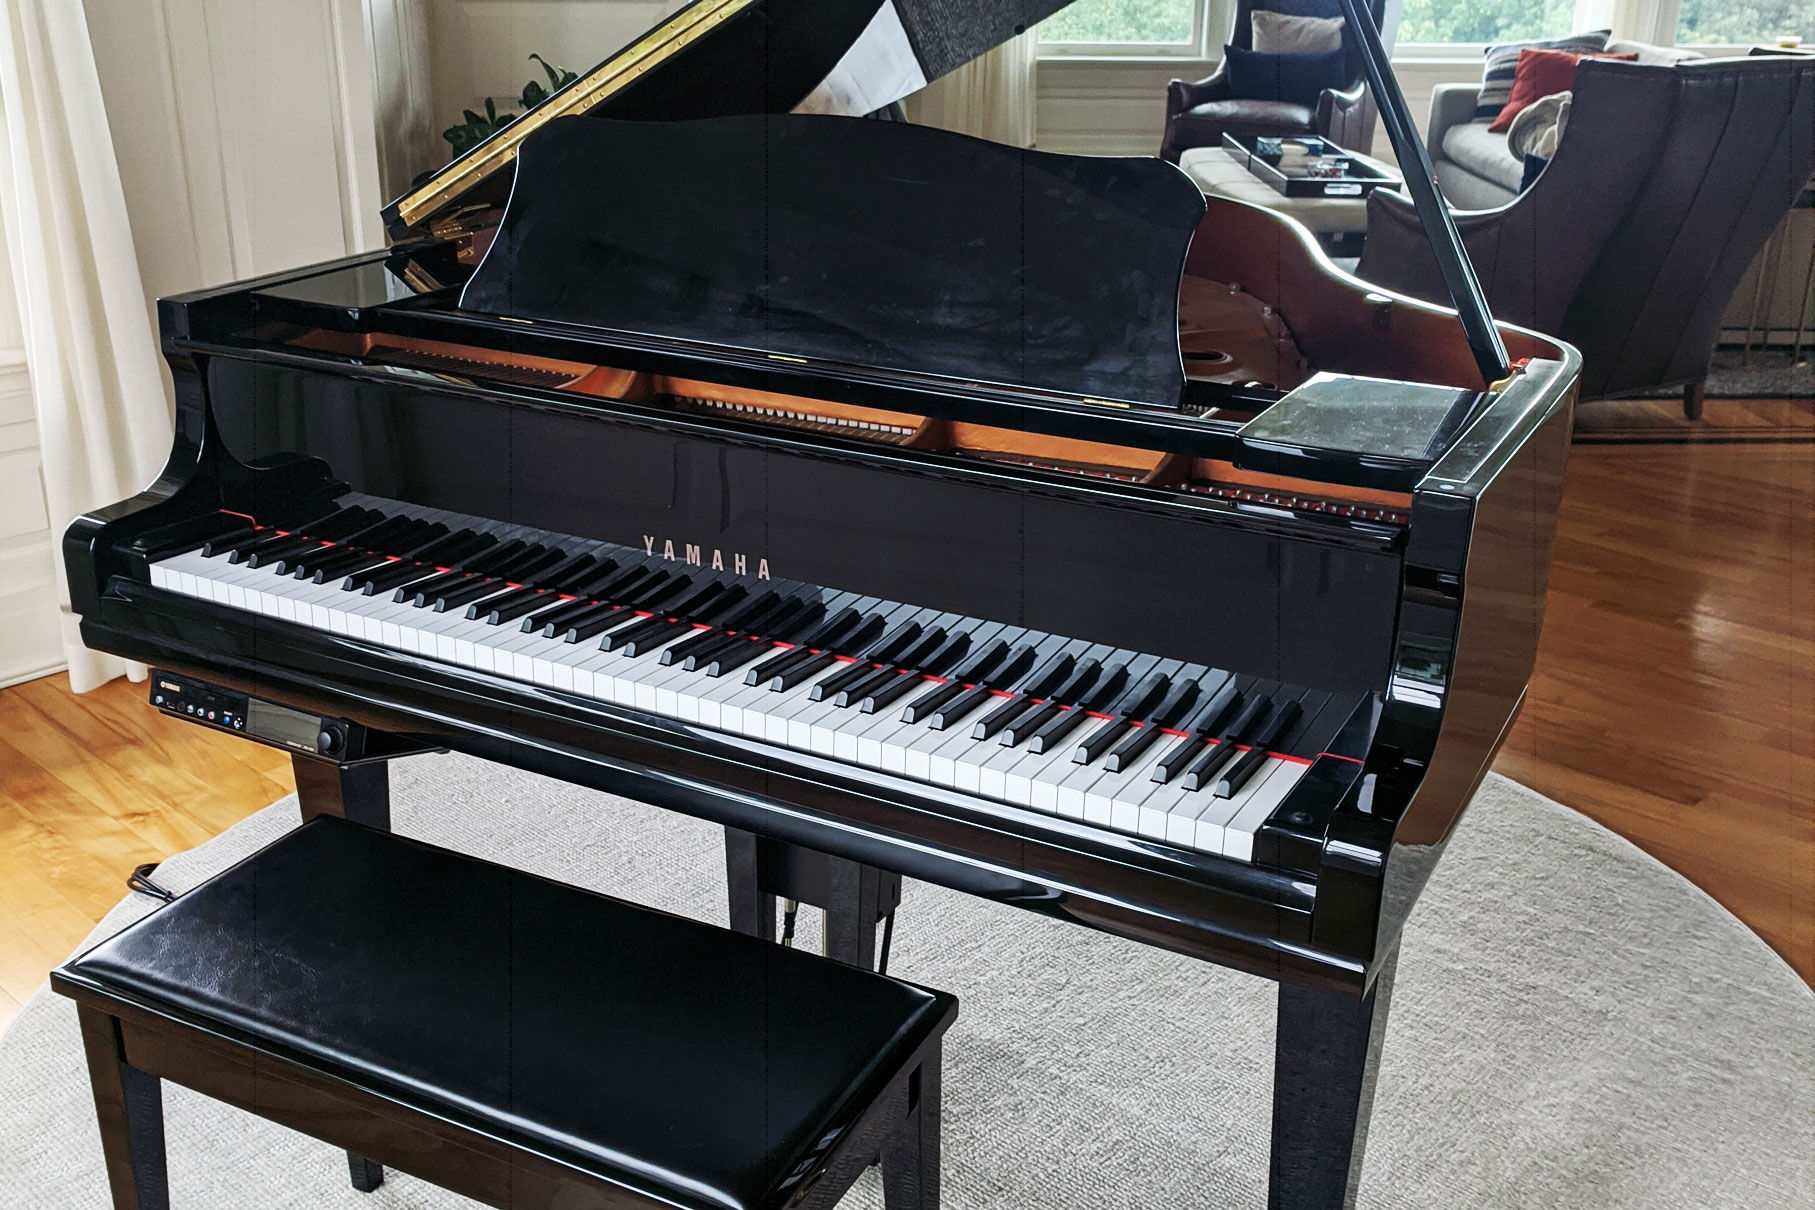
Yamaha Disklaviers are an innovative fusion of digital and acoustic engineering. They allow you to experience famous, concert pianists performing right in your living room, on your piano. They’re an excellent tool for both entertainment and for learning. And of course, they’re just fun to watch. Take a look at this beautiful 2009 Yamaha GC1 Disklavier playing Billy Joel’s Piano Man that I recorded last summer.

They do have one drawback: Connecting them to Wi-Fi networks can be confusing and difficult. Yamaha provides the UD-WL01 adapter, but this is not an intuitive device: Is your Disklavier acting as an access point for other devices, or is it connecting to your Wi-Fi as a client? Is it doing both? Can you tell from the instructions what you’re expected to do, and how you’re supposed to use the Disklavier and connect to the internet at the same time?

I’m sharing an incredibly elegant, simple way to hook up Yamaha Disklaviers. You don’t have to worry about reconnecting it if you change your Wi-Fi password or buy a new router. You can set it up quickly, and it works in most houses.

Supplies

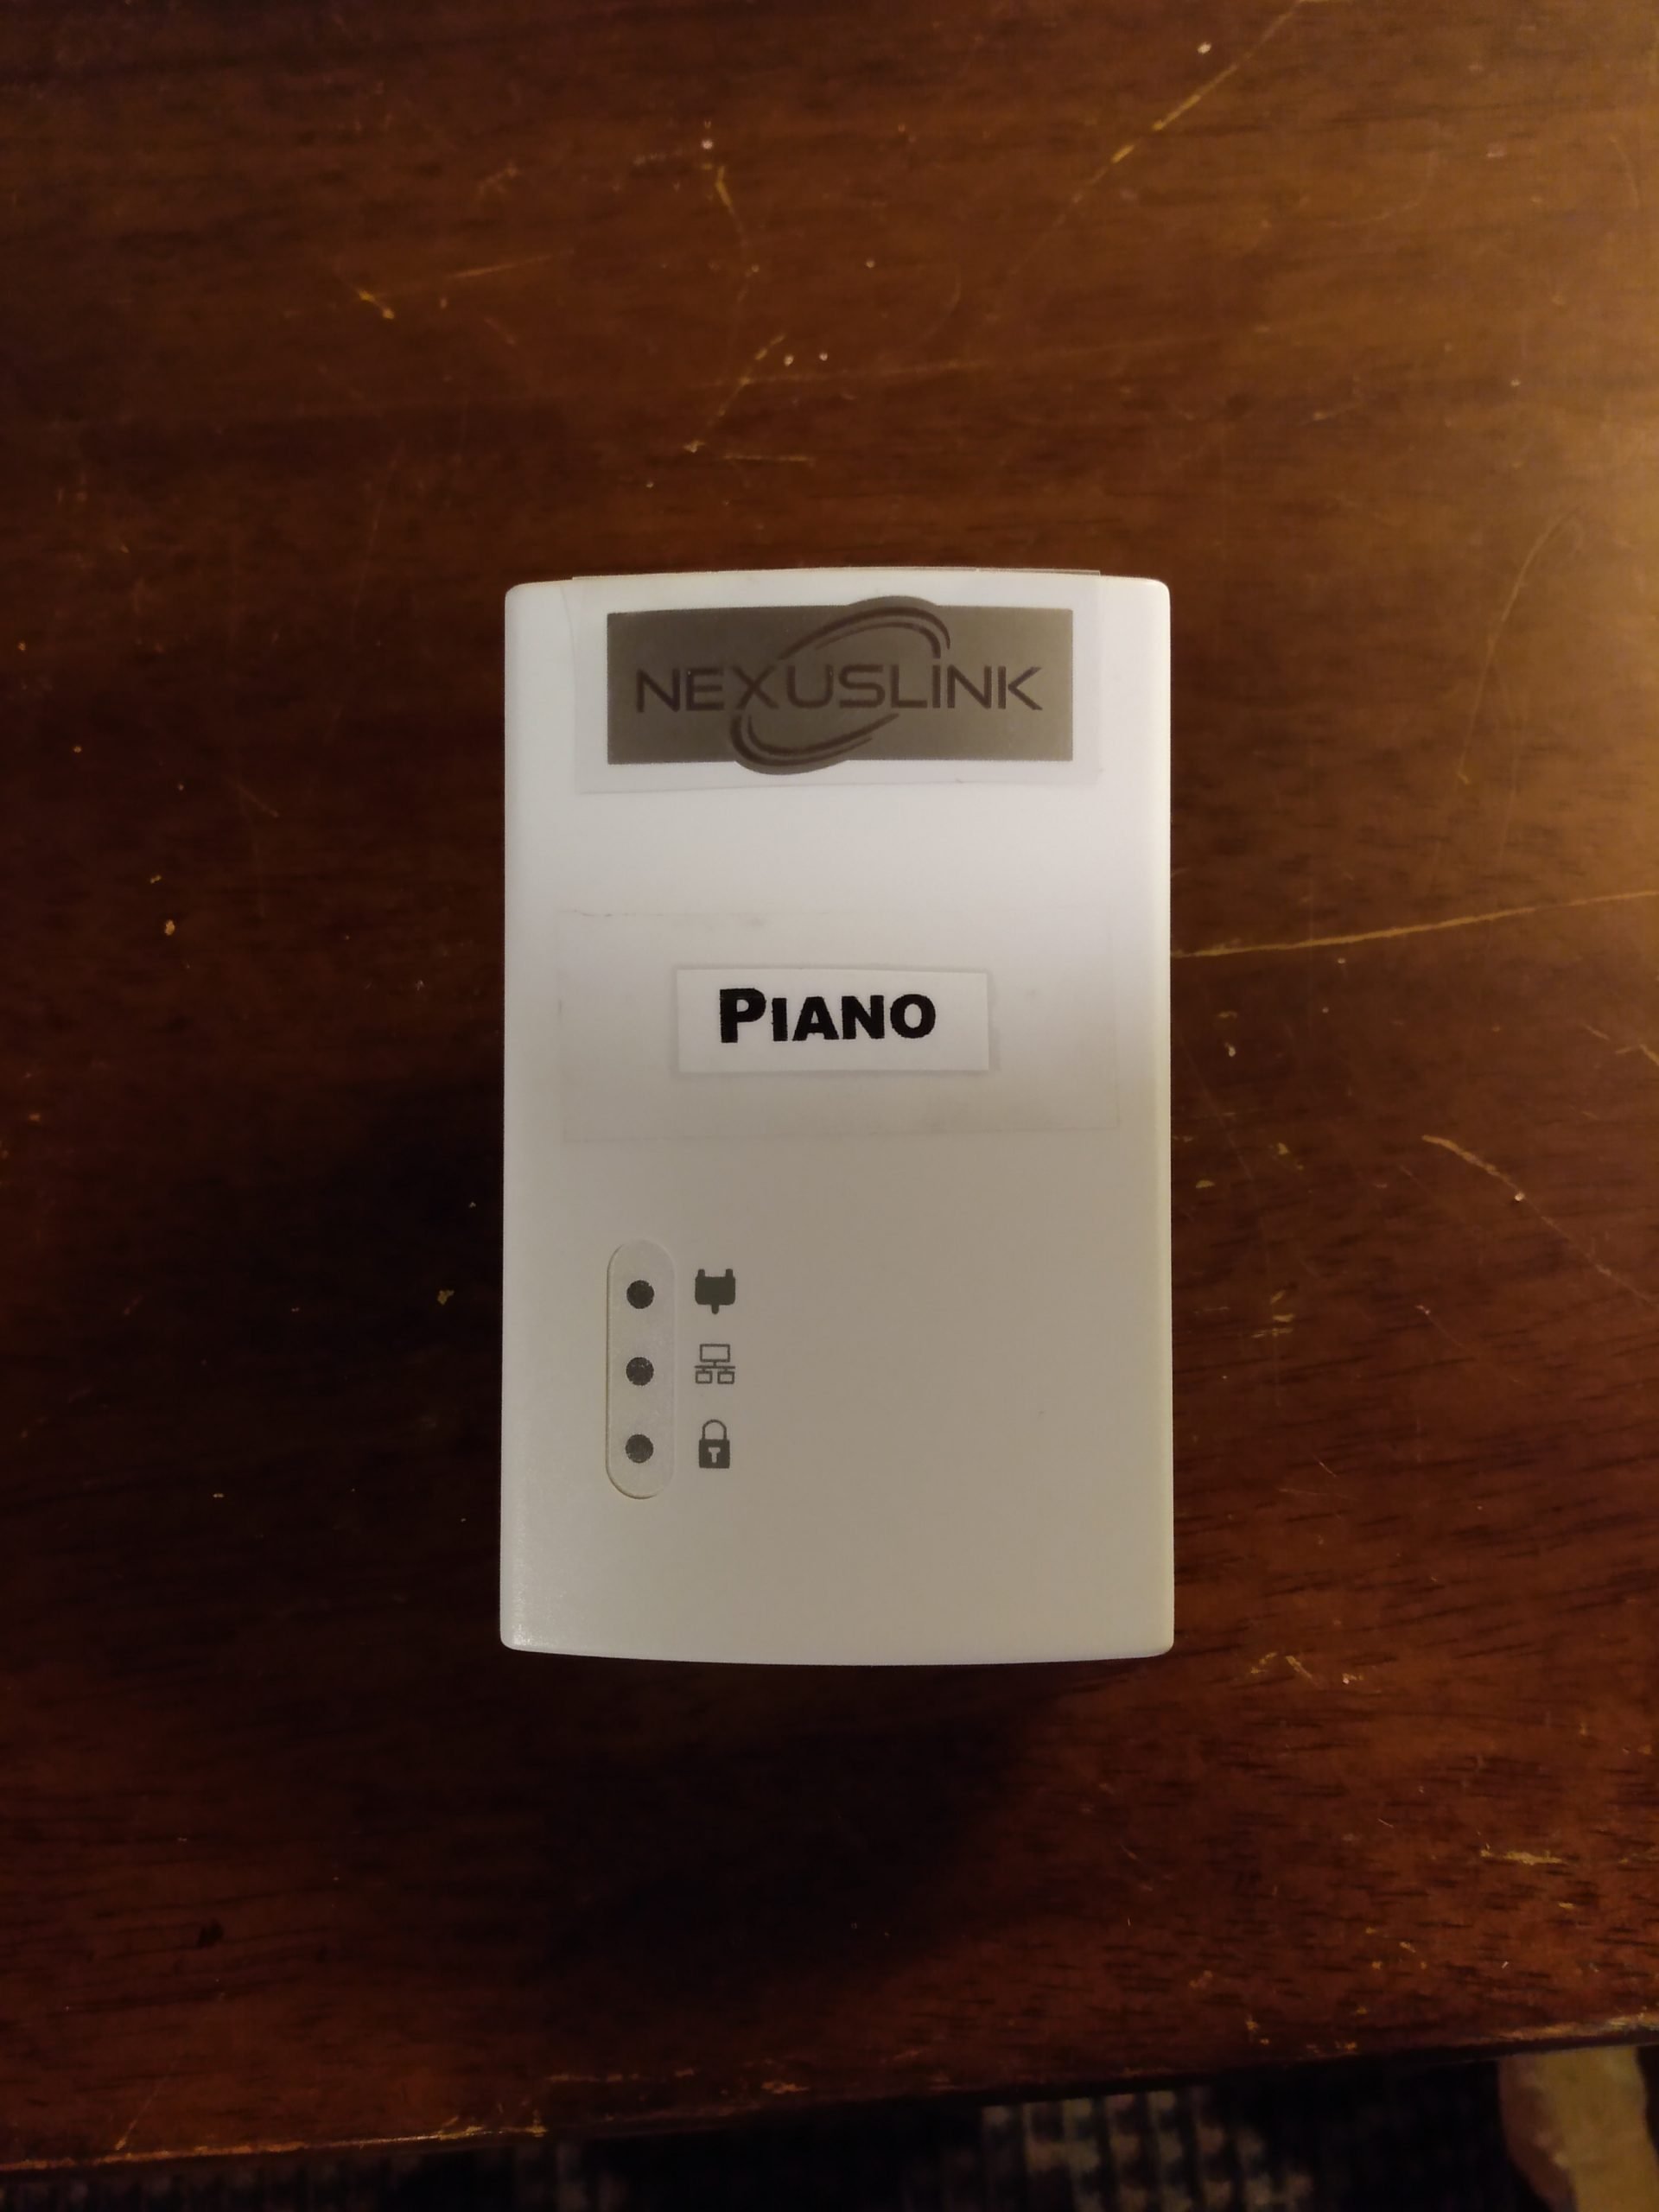
A little redundant labeling makes all the difference. And Small-Caps adds some style.

1. NexusLink Powerline Ethernet Adapters

These devices allow you to network through the electrical lines in a house. Your piano will believe it has a physical connection, and you won’t need to do any further configuration!

These devices are effortless to use once they’re paired: All you have to do to keep your piano connected is plug them in!

Make certain that the adapters are plugged directly into outlets, or into the surge protector below. Power conditioners, universal power supplies, or even higher-end surge protectors interfere with their signal. Similarly, they must be plugged into circuits that are in the same breaker box. Multiple breaker boxes or sub-panels can interfere with the signal.

It’s worthwhile to label the adapters. This will help with troubleshooting in the future. If you have specific networking needs, you can download the full manual for the NexusLink Powerline adapters here.

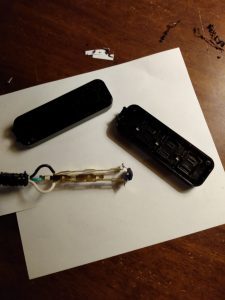
I took it apart so that you don’t have to!

2. GE Designer 3-Outlet Surge Protector

This is an 8-foot extension cord with a three port power strip on the end. It calls itself a surge protector, but doesn’t do any regulation or conditioning which might interfere with the NexusLink signal.

I did a tear-down of the device to make sure there were no surprises: Surge protection is achieved through a metal oxide varistor, and there is no voltage regulation beyond that.

3. Black CAT6 Ethernet Cables (3 feet)

With piano work, subtlety is a must. Anywhere black or concealed equipment can be used, I use it. Three foot cords have always been more than enough for me. In many installations, I’ll even use one foot cords. More cord just means more to hide.

4. 3m Dual Lock Reclosable Fastener (or equivalent)

These are strong, interlocking fasteners that aren’t vulnerable to vibration, and are strong enough to hold up the end of the extension cord. I’ve also used very large (2′) zip ties wrapped around the beams underneath the piano, and these work well.

Installation

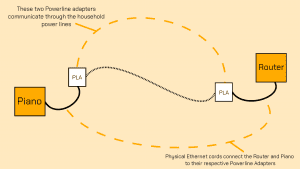
A basic diagram of the installation.

1. Prepare and Pair NexusLink Adapters Beforehand

Remove the two NexusLink Adapters from their box and plug them both into the outlets where you intend for them to go. One will be next to the router and, and the other will be plugged into the extension cord you intend to put underneath the piano. No Ethernet connections are necessary at this time.

If the green connection lights on your NexusLinks turn on (the top light on each adapter), that means they’ve found one another, and are now communicating through your household power. Great!

Now you can secure their connection to each other. On the bottom of each unit (near the Ethernet jack) there’s a small configuration button. Hold it down for three seconds, and the bottom of the three lights—labeled with a padlock—will begin to blink. Now press the same button on the other NexusLink for three seconds. After a short period of time, the padlock lights will turn solid. Then, some seconds later, the connection lights should turn solid as well.

These two NexusLinks are now a permanently bonded pair. No matter where you put them, they’ll find one another. In fact, they’re so tightly paired that they’ll even ignore other NexusLinks.

If you have specific networking needs, you can download a full manual for the NexusLink Powerline adapters here.

2. Run the extension cord up underneath the piano

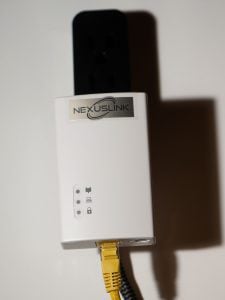
A NexusLink plugged into a power strip, with a ghastly yellow Ethernet plugged into it.

With the Disklavier turned off, unplug the Disklavier.

Pick a good spot to mount the power strip underneath the piano. This is usually parallel to the floor on the side of one of the wooden beams adjacent to the Disklavier controller. (Also, make certain if there is a Dampp-Chaser installed, make sure the NexusLink isn’t near the humidistat, where the small amount of heat it produces might cause less accurate readings.)

Wipe the area down with alcohol. Take two pieces of your Scotch Interlocking Fastener and, after removing the backing, affix both to the back of the power strip. Mount the power strip to the beam.

If possible, try to route the power cord over a beam. This will keep it a more secure in the event it gets pulled on. You can even loop it around the beam once if you have enough cord.

3. Plug everything in

Plug your other NexusLink Powerline Ethernet Adapter into the bottom port of the three of your power strip. Run a short length of Ethernet cord to your Disklavier controller. If possible, loop the Ethernet cord up over the beam to apply a bit of tension. Pianos produce plenty of shaking and vibration, so keep things as secure as possible. Use no more cable than you need.

Now plug the Disklavier power into the power strip (and the Dampp-Chaser as well if one is installed). This extension cord is comfortably rated for the power consumption of all three devices.

At this time, both the green connection lights should be on, and both the padlock lights, meaning the NexusLink Adapters have discovered one another. If this isn’t the case, skip to the troubleshooting below.

Use zip-ties, twist ties, and other appropriate cable management to bundle everything up and out of sight. Stick-on conduit can be used to run cords along the beams if precise positioning is needed, such as if the piano is positioned next to a low couch or somewhere else people might easily see underneath. I’ll actually sit in various chairs in the room and look at the piano.

You’re all done! If it doesn’t work immediately, read on.

No connection! What went wrong?

First: It’s probably a power strip or Universal Power Supply (UPS)

Do not plug either Powerline adapter into a power strip or surge protector if you can avoid it. These often filter out the signal. Only simple power strips (like the GE one I recommend) will not block the signal. When in doubt, plug directly into the wall. And don’t forget to check the adapter that’s near your router. This also needs to be plugged directly into the wall.

Second: It might be the outlet

If the outlet isn’t receiving power, it won’t work. Make sure that the outlet can power other devices, and that it isn’t controlled by a switch.

Third: It might be the breaker boxes

If the house has multiple breaker boxes, then the devices might not be able to see each other. In this case, try different outlets. You can try changing outlets both near the piano and near the router.

If none of the available outlets work, you’ll need to try a different approach. This article is specifically on the Powerline adapter technique, but you’ll need to consider using a Wi-Fi bridge, since the Powerline adapters won’t work for you.

Has it been working for a while, but suddenly stopped?

As with many other pieces of sensitive electronics, if it’s been behaving and suddenly stops, you should power cycle the devices. Unplug each Powerline adapter in turn and plug it back in. If that doesn’t work, pair the adapters again in the manner described in step one.